Cadillac Owners Forum banner
  • BEWARE OF SCAMMERS. Anyone trying to get your money should be checked out BEFORE you send anything anywhere.

Replacing cabin air filter on XT4

19K views 13 replies 8 participants last post by  galaxycarl60  
#1 ·
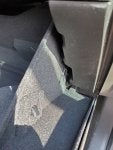
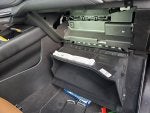
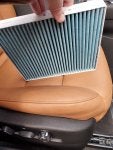
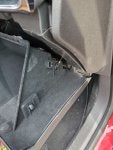
Is it possible for me to change the cabin air filter on my XT4? I searched the web and found several videos for XT5 (none for XT4), but I am not able to get the glove compartment out as those videos noted. My car has a stinky smell whenever I go thru the car wash and other times when it is humid outside. Per my web searches on the XT5, they lamented how the vehicle now comes with a cheaper, plain paper filter - not one with activated charcoal, etc. So, I would prefer to change it myself and put it a different filter than my service center has.
 
#4 · (Edited)
"and a hammer"? That sounds potentially destructive. I'm thinking about doing this as well, and as you note, nobody has made a video on it yet.

Is it a compression thing with the glovebox where you need to push the two sides in to get tabs to release? Or something else? I mean, umm, where were you hitting it with a hammer?! If I really need something like a hammer, I do have a gunsmithing hard rubber mallet I can use instead.

My XT4 Sport has the ionizer, and that definitely helps, but I want activated charcoal too as my wife has very sensitive lungs. Does your XT4 have the ionizer? I'm somewhat concerned the ionizer might be in the same spot as the filter and I could inadvertently damage it when I pull the OEM filter out.

Anybody else have some feedback on this?

If I do it, I'll take pictures and post them here.
 
#5 ·
I'm back... I do not have the ionizer, so not sure if that makes a difference or not...

Anyway, I could get the left side of the glove box out with no problem - it was just the right side that we had issues with. If you could, you really just need to compress the 2 sides toward the middle. So, with me pulling the left side in and the whole glove box down, my neighbor put the butt end of the hammer near to the location on the right side where it was still catching, and gave the claw end a light thump - just enough to compress the right side a tad more and get past the stop. Remember I'm puilling it down as he gave the thump and it just popped past the stop. As far as I can tell we did not damage the glove box nor the stops at all. Good luck!
 
#7 ·
I can't believe I didn't get a picture of the filter in the compartment. I'm sure I must have tried to take one, but I must have fat-fingered the button on the phone screen.

This vehicle has the air ionizer, and I did not see any evidence it is co-located with the cabin air filter and so you don't have to worry about damaging it.

I'd say it is generally going to be more comfortable for most people to have two people cooperate on compressing the glovebox, one from each side, to get it to pop free. I'm not saying one person can't do it, but two is probably more comfortable. We used small levers on both sides simultaneously to make it a littler easier.

The actual filter compartment door swings down from the top (there are two hinges along the bottom edge) after compressing the tabs on the far end of both sides (which seem pretty flimsy, so be careful with those tabs).

There are multiple options for replacements. The GM OEM is just white paper, but GM does also offer an OEM with active carbon you can buy. This third-party replacement in addition to active carbon also has baking soda infusion and an (they claim) anti-microbrial layer. Air flow goes from top to bottom, and the activated side of the filter should be down. You'll see the bottom of my third-party pic in one of the pics as I'm holding it up. The pic of two filters has the top of the GM OEM (but the bottom looks just the same) versus the 3rd party one at the bottom of the pic.

Good luck!
 

Attachments

#10 ·
I am a GM (Cadillac) Master Technician. It takes a little bit of pressure on either side of the glove box to get passed the tabs. The Right side is a bit harder to release than the left. What I do is pull the left side first with having somewhat down pressure on the door. Once that releases the stop I then go to the right side and PUSH slightly harder inward with a down motion and it will clear the stop. Do NOT take the tension cord off! No need to. You can then access the filter by pushing in the two tabs on the filter door. It will swing down, pull the old one out and note the airflow arrow as it needs to be pointing downward for correct airflow. Hope this helps.
 
#14 ·
Open the glove box. A light is needed to visualize the filter compartment. You will need a long flat head screwdriver depress 1 clip at each end of the filter box, door will fold down exposing the filter. it can be a little tight getting the filter out and back in. The filters are soft, so a little patience Goes a long way. This is much easier and takes about 3 to 5 min.